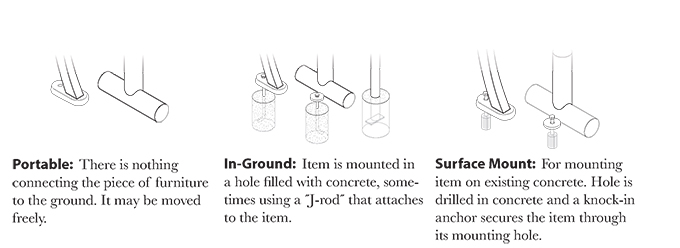
Mounting Style
How would you like your bench mounted. There are three different ways for mounting a buddy bench: Portable mount, surface mount or in-ground mount. The in-ground mounting style is only available for the Perforated Metal Benches. Below is a description of the different base mounting styles.
- Portable Mount: may have surface mount holes in the legs of the furniture, but if the pieces are not secured with bolts and anchors, the furniture may be moved. Furniture with a tubular understructure has no surface mounting holes. Portable Mount furniture may be placed on any surface.
- Surface mount: fixtures have holes in the legs of the furniture for bolts to be inserted into anchors embedded in concrete. When installing, holes must be drilled into existing concrete surfaces to embed anchors for the bolts. Furniture with tubular understructure has discs welded to the understructure which rest flat on the ground so that bolts and anchors can then be secured through the discs. Surface mount furniture is placed on a concrete surface.
- In-ground mount: furniture resembles surface mounted furniture, but includes “J-Rods” to be inserted through the surface mount holes on a piece of furniture. The bottom of the J-Rod is then embedded in a hole filled with concrete. When the concrete cures, the shape of the J-Rod secures the furniture. Benches that have tubular legs and are in-ground mounted do not use J-Rods. Instead, the understructure ends in approximately 18″ of extra pipe with a piece of flatbar welded to the bottom. A deep hole is then dug and filled with concrete. The bench is then set in the concrete to cure. In-ground mounted furniture is placed on a grass or soil surface.
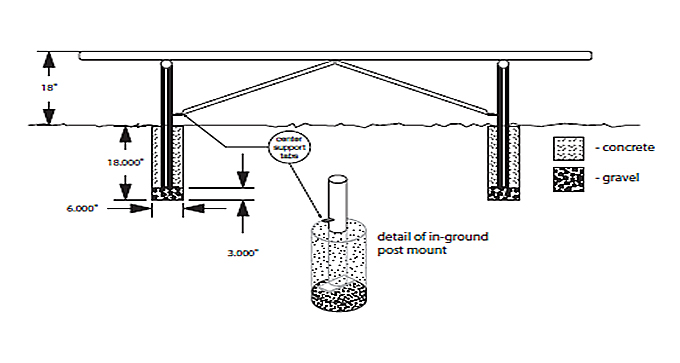
In-ground Mounting
Recommendations for mounting bench with in-ground mounts:
- Measure the distance between the in-ground posts and mark the areas where you wish the holes to be dug.
- The holes should be dug to a minimum of 3x the diameter of the post that is going to be concreted in place.
- The hole should be approximately 18″ deep with a 3″ layer of gravel at the bottom of the hole. Make sure the center support tabs on each leg rise above the surface of the ground the bench is being installed in.
- After placing the bench into the holes and resting on the gravel, cement is then poured to fill in the holes.
- You should support the bench while waiting for the concrete to cure so that it remains true.